HiCyou Open-Source Directory: Detailed Zero-Cost Deployment Guide
HiCyou is a free, open-source directory platform designed to help you discover, …
HiCyou is a free, open-source directory platform designed to help you discover, organize, and submit useful tools and resources. Built on top of services like Vercel, Supabase, and Cloudflare R2, you can deploy your own link directory / resource hub at essentially zero cost — perfect for aggregating quality links, driving traffic to your main site, or showcasing curated resources.
HiCyou is ideal for indie developers, site owners, and teams who want to quickly spin up a “tool library / resource library” style site. You can use it to display and collect links yourself, or open it up for user submissions to build a continuously updated, high-quality directory.
Example use cases:
- Build a niche industry directory
- e.g. AI tools directory, indie-hacker resources, designer tool collections, etc.
- Organize by industry, function, tags, etc., to make browsing fast and intuitive for you and your users.
- Boost your domain’s DR / DA and other SEO metrics
- Use the directory as a “resource hub” for your main site or other projects.
- Thoughtful internal/external linking can help improve domain authority — useful for domain resale or managing a portfolio of sites.
- Create a personal / team resource center
- Centralize commonly used tools, internal systems, and documentation links.
- New teammates or partners can get all important links in one place.
- Publicly showcase curated tools and sites
- Use it as a “recommended resources” sub-site for your blog, personal homepage, or brand website.
- A curated resource list can improve perceived expertise and trust.
Prerequisites
Before you start, make sure you have the following:
- Code repository – If you forked this project, ensure the repo exists under your GitHub account.
- Vercel account – For hosting the frontend and API.
- Supabase account – For the PostgreSQL database and Auth.
- Cloudflare account – For R2 object storage (to store images).
Step 1: Configure Supabase (Database & Auth)
For a more detailed walkthrough with screenshots, see:
Supabase Guide: Set Up a Database, Configure Auth, and Integrate Resend from Scratch
- Log in to the Supabase Dashboard and create a new project.
- Get your database connection string:
- Go to Project Settings -> Database.
- Under Connection string, copy the URI-style connection string. This will be your
DATABASE_URL. - Note: For production, it’s recommended to use the Connection Pooler (port
6543) for better connection management.
- Get your API keys:
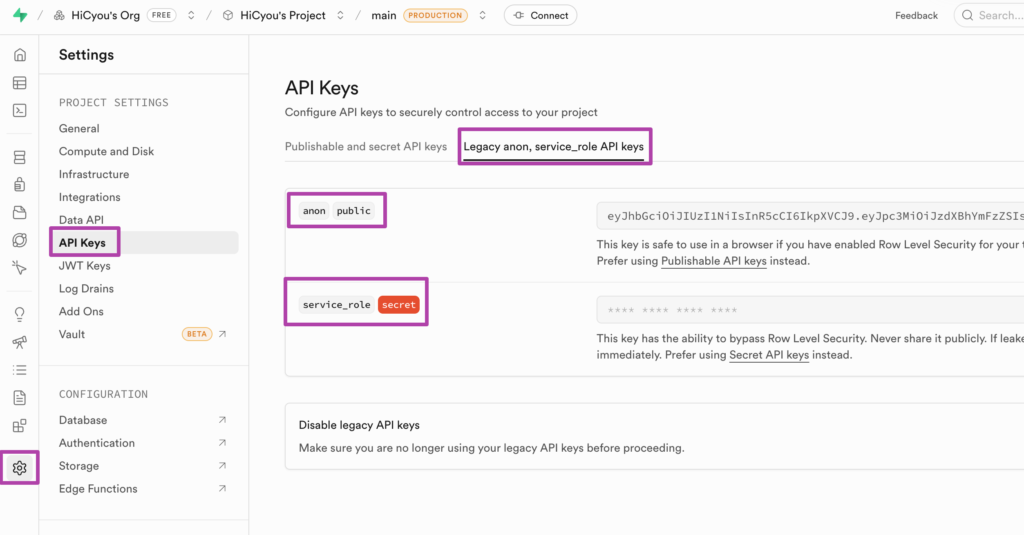
- Go to Project Settings -> API Keys -> Legacy anon, service_role API keys.
- Copy the
anonpublic key →NEXT_PUBLIC_SUPABASE_ANON_KEY. - Copy the
service_rolesecret key →SUPABASE_SERVICE_ROLE_KEY. - Copy the Project URL →
NEXT_PUBLIC_SUPABASE_URL.
Step 2: Configure Cloudflare R2 (Image Storage)
For a more detailed step-by-step guide, see:
Cloudflare R2 Guide: Free 10GB Storage, Free Egress, and S3-Compatible API Keys
- Log in to the Cloudflare Dashboard.
- In the left sidebar, go to R2.
- Create a bucket:
- Click “Create bucket”, choose a name (e.g.
hicyou-assets), and select “Automatic” or a region close to your target users. - Save this as
R2_BUCKET_NAME.
- Click “Create bucket”, choose a name (e.g.
- Configure public access:
- Open the bucket you just created, go to “Settings” -> “Public Access”.
- You can either bind a custom domain (recommended) or use an
r2.devsubdomain. - Save the public base URL — this will be your
R2_PUBLIC_URL.
- Create an API token:
- Go back to the main R2 page and click “Manage R2 API Tokens” on the right.
- Click “Create API token”.
- For permissions, choose Object Read & Write.
- After creating, note the following values:
Access Key ID→R2_ACCESS_KEY_IDSecret Access Key→R2_SECRET_ACCESS_KEYEndpoint– e.g.https://<ACCOUNT_ID>.r2.cloudflarestorage.com- You only need the
<ACCOUNT_ID>part forR2_ACCOUNT_ID.
- You only need the
Step 3: Local Configuration & Database Sync
Before deploying to Vercel, we’ll configure environment variables locally and sync the database schema and seed data to Supabase.
1. Set up local environment variables
- In the project root, copy the example env file:
cp .env.example .env - Open
.envand fill in your Supabase and Cloudflare R2 values, plus your AI-related keys if needed:# Supabase NEXT_PUBLIC_SUPABASE_URL=https://xxxx.supabase.co NEXT_PUBLIC_SUPABASE_ANON_KEY=eyJh... SUPABASE_SERVICE_ROLE_KEY=eyJh... # Database (recommended: Connection Pooler on port 6543 with ?pgbouncer=true) DATABASE_URL="postgresql://postgres.[ref]:[password]@aws-0-[region].pooler.supabase.com:6543/postgres?pgbouncer=true" # Cloudflare R2 R2_ACCOUNT_ID=... R2_ACCESS_KEY_ID=... R2_SECRET_ACCESS_KEY=... R2_BUCKET_NAME=... R2_PUBLIC_URL=...
Environment variable reference:
Variable
Description
Database config
NEXT_PUBLIC_SUPABASE_URL
Supabase project URL
NEXT_PUBLIC_SUPABASE_ANON_KEY
Supabase anon key
SUPABASE_SERVICE_ROLE_KEY
Supabase service role key
DATABASE_URL
Postgres connection string
Storage (R2)
R2_ACCOUNT_ID
Cloudflare account ID
R2_ACCESS_KEY_ID
R2 access key
R2_SECRET_ACCESS_KEY
R2 secret key
R2_BUCKET_NAME
R2 bucket name
R2_PUBLIC_URL
Public base URL for R2 assets
R2_UPLOAD_DIR
Upload directory prefix (can keep default)
R2_LOGO_DIR
Logo directory name (optional, default is fine)
R2_COVER_DIR
Cover image directory name (optional, default is fine)
Site basics
NEXT_PUBLIC_SITE_URL
Production domain for your site
NEXT_PUBLIC_SITE_NAME
Site name
NEXT_PUBLIC_MAIL
Contact email
NEXT_PUBLIC_Blog
Blog URL
Security & admin
ADMIN_EMAILS
Admin email addresses (comma-separated)
CRON_SECRET
Secret for cron jobs (any long string; openssl rand -hex 32 works great)
Sponsor config (optional)
NEXT_PUBLIC_SPONSOR_IMAGE_URL
Sponsor image URL
NEXT_PUBLIC_SPONSOR_LINK
Sponsor link URL
NEXT_PUBLIC_SPONSOR_TEXT
Sponsor text
Other (optional)
EXASEARCH_API_KEY
Exa search API key
NEXT_PUBLIC_TURNSTILE_SITE_KEY
Cloudflare Turnstile site key (default can be CF’s test key)
TURNSTILE_SECRET_KEY
Cloudflare Turnstile secret key
AI config (optional)
Chinese providers like Qwen, DeepSeek, Kimi are supported
AI_API_KEY
API key for your AI provider
AI_BASE_URL
Base URL for the AI API
AI_MODEL
Model name
2. Run database migrations (Schema Migration)
This will create all required tables and database structures in Supabase.
# Push migrations to the remote database
pnpm db:migrate
3. Seed initial data
This step inserts default categories and sample data so you have something to look at right away.
# Run the seed script
pnpm db:seed
Step 4: Vercel Setup & Deployment
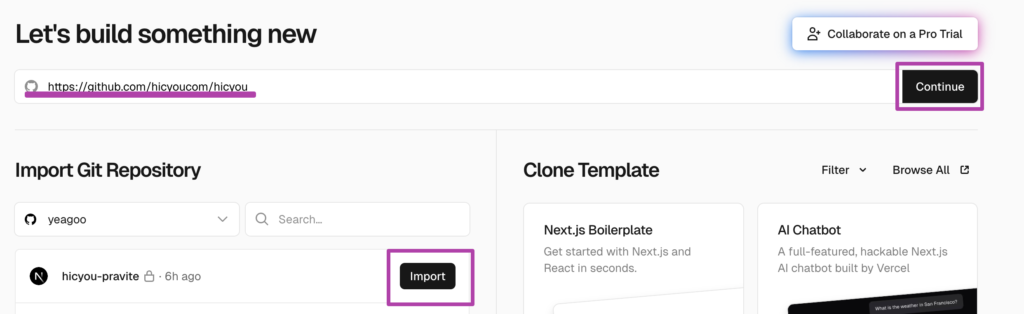
- Log in to the Vercel Dashboard.
- Click “Add New…” -> “Project”.
- Select your GitHub repository and click “Import”.
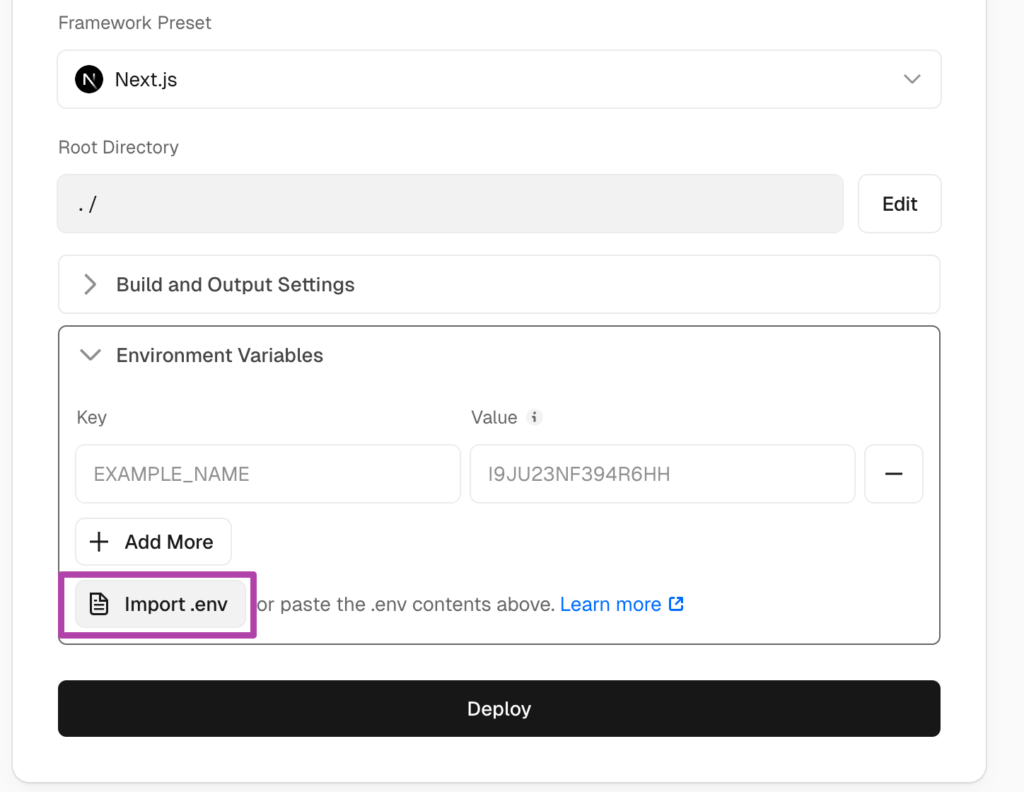
- Framework Preset: Vercel should auto-detect this as Next.js — no need to change it.
- Environment Variables (critical step): Expand the Environment Variables section and copy over everything from your local
.envinto Vercel’s env vars. - Click “Deploy”.
Step 5: Post-Deployment Checks
- Wait for the build to finish: Vercel will run
next buildautomatically. - Check the homepage: Open the assigned domain and make sure the homepage loads correctly.
- Validate database reads: Browse categories and detail pages to confirm data is loading from the database (since you ran the seed step, you should already see data).
- Check Auth: Click Login and verify that Supabase Auth works. Make sure you’ve added your production domain as a redirect URL in Supabase Auth settings.
- Test image uploads: Log in with an admin account, submit a new tool, and confirm that image uploads to R2 are working.
- Cron Jobs: In your Vercel project, go to Project Settings -> Cron Jobs and verify that scheduled tasks are configured as expected.
FAQ
- Supabase Auth redirects to the wrong URL after login Make sure you’ve added your Vercel domain under Authentication -> URL Configuration -> Site URL / Redirect URLs in the Supabase dashboard.
- Image upload fails
- Check that your R2 API token has Write permissions.
- Confirm that
R2_PUBLIC_URLis correct and publicly accessible.
- Database connection errors
- If you’re using the Connection Pooler (port
6543), ensure yourDATABASE_URLincludes?pgbouncer=true.
- If you’re using the Connection Pooler (port
- Local development
- Before starting local dev, make sure
DATABASE_URLin.envcan connect successfully. - Then run:
pnpm dev
- Before starting local dev, make sure
Good luck with your deployment — and enjoy running your own open-source directory powered by HiCyou!